The angle of highback, lifts, cantings...
We are buying new equipment. We have a proper board and we know why because we read the rest of articles on this site;). We have boots. We have bindings, for hardbooters probably F2 race Titanium.
And we are starting to set up it all to work correctly.
Let's start with boots and bindings.
Bindings angle and setting center of the boot.
Bindings angle and boot center are related topics. Experienced riders know their angles. But for beginning carvers, especially changing softboot to hardboot there is one principal rule:

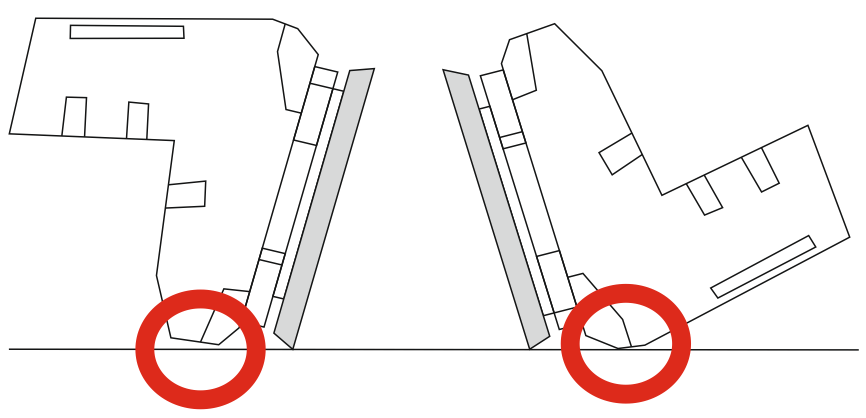
No part rear boot-binding set can touch snow when board angled 80-90degrees. And it must be symmetrically. So if we angle the board near 90degrees, the outermost part of boot/binding should touch (or better not to touch) ground at the same board angle for frontside and backside.
The angle of front binding is greater so when the rear binding set as above, no part of front binding/boot should touch the ground.
This causes the center of boot setup.
Almost every boot has marked a "center". Center of what is this? Of overall boot length? Of shell sole? of liner? Or maybe point od your center of gravity projection? To be honest, it is not so important... If you have a center of boot set up perfectly, but some parts of boot/binding extend beyond board edge, if you tilt a board enough, you will "loose edge" and fall. For us, it is the end of "boot center theory". Much more important is to have no part od foot/binging extending board edge.
For hardboot bindings, like F2 Race Titanium there is a horizontally positioned screw, which adjusts binding length. For other bindings that could be vertically positioned screws that keep front and rear ports of binging with a binding plate.
For most of softboot bindings it a screw that mounts binding base/frame with highback. Also, toe-strap can be moved a little front or rear. Unfortunately, when to change the position of the screw that mounts highback, you will also change highback angle... and very often also ankle-strap position...
And for sure a lot of people will ask for pads/power-links etc. If we have long boot shell (softboot or hardboot does not matter) and not wide enough board, any kind of plate which will rise your binding higher, will be good resolution. But remember that always the higher the center of mass the less stability. We need to choose between two evils...
Highback /boot cuff angle.
For hardboot problem almost not exist. Click a lock and thats all... What angle? If we have lifts assembled to both bindings we are set the same angle for bot boots. We recommend the middle to maximum angle range. For bindings without lifts or only for rear binding, we recommend setting the angle of the front boot to middle and rear for maximum.

Softboot is much more complicated. We need to match highback angle with biot stiffness. The main rule is that highback must contact with a boot for all its area.
The angle must be maximum that boot allows. The boot must contact all highback area, especially near the boot heel. Also when straps fastened, boot shell can not "breaks/kinks".
There are many kinds of highback angle systems. The worst situation is if we have only three holes in binding base/frame and no lever/regulation on the back of highback. In this case when change od highback angle, by the change of mounting hole, we are also moving boot forward. We need to compensate it on a binding base disc, by moving it on mounting rails. But if you also want to rotate highback, what is need for softboot carving we have quite a big problem to set it up properly. Almost always one of the elements (move of binding forward-backward across the board, highback angle and highback rotation) will be set up not as desired. Much worse if we use disc mounting rails to adjust stance. In this case, we can not use it to move binding across board... Again, w need to choose less evil...
Without electric screwdriver it is really a lot of tedious work...
What for?
Reaction time:
For softboot it is one of the fundamental things. What for the alpine rider are riding in hard shells? Because the stiffness of the plastic boot even small movement is transferred to board, and the board reacts almost immediately. It is also very very important for softboot. For example, for backside turn, if highback does not fit to boot, the time until boot will lean on highback is lost. For frontside turn time until our shin will feel the resistance of boot-ankle strap will also be lost. During this time, we perform some movement, which is not transferred to the board, so it has no impact on our ride. So we need to angle our positon for example 5degrees more inside the turn, then in hard set, to have board tilted the same angle, or have any reaction of the board. During this time, there is a possibility of slide instead of on-edge turn. Is it really important in the beginning of carving adventure.
It does not mean that you need the hardest softboot boots, but a set of boot-binding must be correctly set up to have no looseness, for transferring as much as possible of any of your move to the board.
Comfort:
It is not the most important aspect but can be quite important...
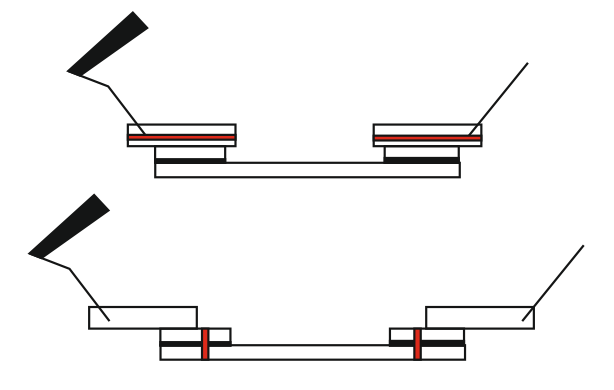
Try to stand in your snowboard position and do a squat. Look at your back hill. Is it lifted? That is why we recommend using a lifts for the front toe and back hill. How it affects our board? It's simple... Makes our board a propeller. The less transverse stiffness of the board, the twist will be more. So part of the board is tilted more and part less and the board will not work symmetrically, and load on edge will also be not even. Some parts of the board will be overloaded and some parts will be much more underloaded. It will affect how our board ride on-edge turn, and increase the probability of a slide.
When your back ankle lifted, the affect of your position to board twist is smaller. If also front heels lifted - the better.
Second if comfort. With both lifts assembled, you can set a few cm greater stance that for flat bindings, and you will feel the same.
Third, are your hips rotation. It is good for backside, when you are beginning your carving adventure.
But sad information for softbooters. Such adjustment is not available for 99% of softboot bindings. You can use dome lifting/canting pads but is is not easy to find. We can compensate it a little for example by more angle of back highback but it is not the same.
Cantings:
Please try again. stand in your snowboard position and do a squat but keep your knees together. Did the rear heel go up? This is an idea of cantings. But this position is not a natural position, and not so healthy for your knees. But it is how was snowboard in 1990s like "Hard Attack Catapult Video" ;) Most of old bindings have integrated cantings. Important is to set it to be canted inside, not outside. That is all we can do in this case.
We do not like cantings. We recommend removing it is possible. It disrupts natural position. The knees works much healthy for flat binging or better for bindings with lifts.
But for softboot bindings, unfortunately, lifts and fortunately canting regulations do not exist.
Cantings and lifts for F2 Race Titanium.
It is the part of the article that most of you for sure were waiting. What can, and should do with our new F2RT bindings when box received?
If you have different bindings, but you are able to do similar adjustments, you can do it, but on your own risk. But for some models, you can buy additional lifting and canting plates.
In a box with new F2 race Titanium we have:
- Two bindings with assembled cantings.
- one kit od lifts (two parts, small wedge and big cube with one side angled)
- kit od three screws for lists assembly.
At first, we need to go get to vertical screws mounting front and rear elements of binding to a binding plate. For that, you need to use the horizontal screw used to boot length adjustment. For L or M size you need to move it out or inside. When vertically screws visible do not use boot length adjustment more, not to damage it. When you feel resistance on these screws - stop!
Unmount front and rear part of the binding. Watch out for washers with thread. They are on the bottom side of the plate, under rubber protection.
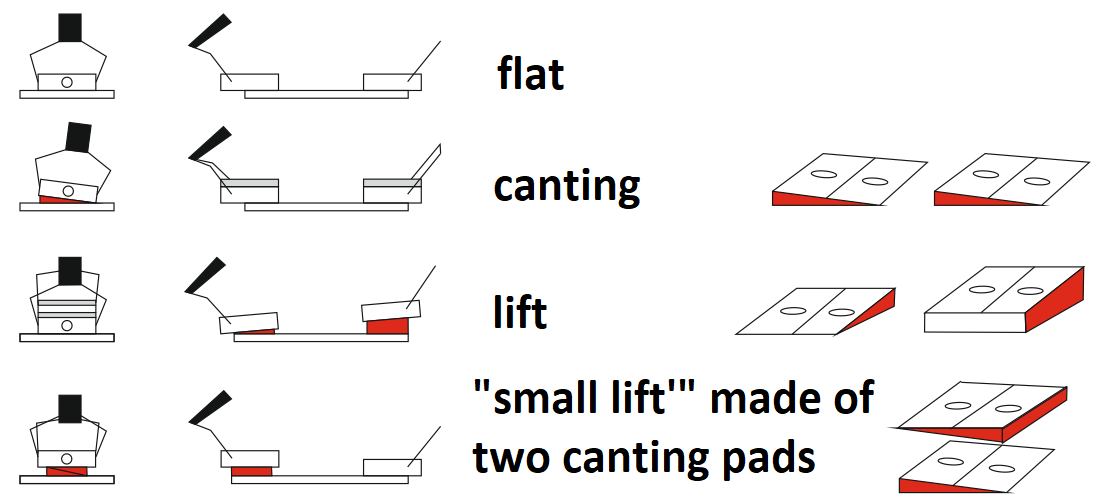
Now we can arrange the blocks ;) We suggest to assembly "factory lift" to rear binding, and for front one we can use two canting plates to have on "small lift" under front toes.
- throw out one set of cantings.
- Rear lift. Big cube goes under a heel, to be angled inside, and a small wedge under toes to have one plane with a cube angle. For cube please use two longer screws.
- Front "small lift". Put two cantings together. we can use the same screws that were here. If you want to have "big lift" from four canting plates, you need to have one additional longer screw. Such is no in a kit.
Better, instead "small canting lift" to buy an additional normal lift, but it costs. If it is not a problem for you, do so/
It is possible to attach both lift and cantings. But we do not know what for... we do not recommend it.
At the end two things more:
- Remember to assembly rubber pads, at the bottom side of the binding plate!
- Check if washers with thread (used to mount front and rear parts of bindings to a plate) from bottom side of the plate are assembled properly. When not matched, they like to break.
- Check those washers every winter id there are no break, especially between washer and thread.
- Check periodically the vertically mounting screws if not loosen.

REMARKS:
Notice that SnowboardAcademy.pl website contents only chosen aspect of snowboarding. This is not an complex publication "how to snowboarding". The authors are responsible for any individual attempts of performing descibed snowboading elements of technique or equipment adjusting.
All rights reserved. Copyrights SnowboardAdacemy.pl
This website and it content are legally protected by Polish Law, currently effective Act on Copyrights and Related Rights.
Copying and further publication of its contents without a prior author's consent and source (www.SnowboardAcademy.pl) indication is strictly forbidden.
e-mail: info@shaman-snowboard.pl
|